There are many lighting techniques and conventions assocuated with thriller movies, two of which are high and low key lighting. Both High Key images and Low Key images make an intensive use of contrast, but in a very different way.
High key lighting

The term high key and low key lighting is regularly heard in photography circles but often misunderstood. In it’s simplest terms a high key image is a bright image full of light and mostly white tones. It making use of reflectors and minimising and stopping any chance of shadows being caused. Usually using filters, so the hard light is softened. An example of this is shown to the left, it is using high key lighting.
High-Key lighting is almost the opposite, having many lights, making use of reflectors and minimising and stopping any chance of shadows being caused. During the set up of low key, varies different cameras are used to aliminate as many shadows as possible.

Low key lighting

For low key images, less lights are often used but precision is required in the application of the lighting to control important shadow detail. Successful low key lighting is often directed towards camera from behind the subject and is flagged to avoid spill and directed to bring out edge detail.
The skill is in making sure that the areas of importance are either pinpointed with controlled pools of low powered light or the careful application of reflectors. In the set up of low key lighting only one light is used generally, this one light used is also usually hard light, to exploit the shadows of the face even more, the contrast created with low-key lighting makes it very "in your face" and makes it stand out; although it Is possible to use a soft light and still have low-key lighting.
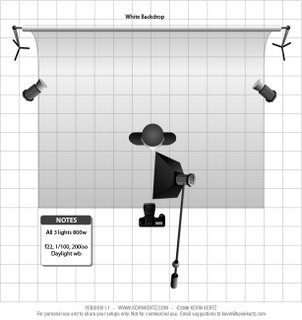
Three point lighting technique
The Three Point Lighting Technique is a standard method used in visual media such as video, film, still photography and computer-generated imagery. It is a simple but versatile system which forms the basis of most lighting. Once you understand three point lighting you are well on the way to understanding all lighting.
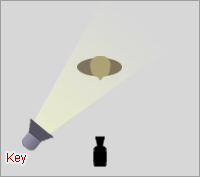
Key light
This is the main light. It is usually the strongest and has the most influence on the look of the scene. It is placed to one side of the camera/subject so that this side is well lit and the other side has some shadow.
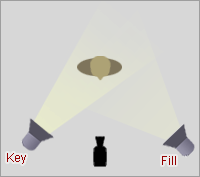 Fill Light
This is the secondary light and is placed on the opposite side of the key light. It is used to fill the shadows created by the key. The fill will usually be softer and less bright than the key. To acheive this, you could move the light further away or use some spun. You might also want to set the fill light to more of a flood than the key.
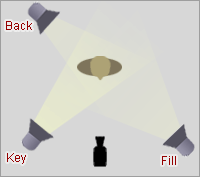
Back light
The back light is placed behind the subject and lights it from the rear. Rather than providing direct lighting (like the key and fill), its purpose is to provide definition and subtle highlights around the subject's outlines. This helps separate the subject from the background and provide a three-dimensional look.
No comments:
Post a Comment